
Planning Your Paddle: 01- Reading the water
In my early days of paddling, when I was so green I didn’t know what I didn’t know, a friend and I launched our kayaks from Singing Beach, aiming our bows northeast to explore the coves and rocky headlands of Manchester by the Sea. We moved swiftly past Eagle Head and into the coves that cut deeper into the cliffs. After poking for a bit around the partially submerged islands of rocks that make this area so interesting for paddling, we turned to head back. As we rounded Eaglehead for the last stretch, we were met with a headwind we didn’t know to think about. The shoreline creeped by inches at a time. Our short and wide rec kayaks were ill-matched to this level of exposure (we’ll talk about boat/board choice next week), and we began thinking of ways we could hop out and drag the kayaks along the steep rocky shore. However, a quick glance at the swell washing over the rocks put an end to that idea. We resorted to putting our heads down and paddling hard. The story, luckily, has a rather boring ending: we made it safely, ,if a bit tired, and having learned a valuable lesson about a wind we didn’t even know to check for.
A little understanding about the water we were paddling in, and how the wind affects it, would have saved us a lot of trouble. That’s what this first blog in our series “How to Plan An Effective Paddle Adventure” is all about. Without getting deep in the weeds, we’ll cover simple concepts that are essential to planning a paddle that we walk away from smiling, rather than asking “What happened out there?!”.
One of the biggest mistakes new paddlers make is treating all bodies of water the same. The reality is that whether paddling in the ocean, estuaries, freshwater rivers, or lakes and ponds, each presents its own unique challenge under different conditions. Below, we’ll lay out three simple things you can look at before you even unload your boat that will dramatically improve your chances of having a good paddle.
1) Exposure
Is the body of water generally protected, or exposed to wind and swell?
Wind
Small lakes and harbors might stay relatively calm even on windy days, but lakes, ocean, and stretches of some rivers can be pretty exposed. The key is understanding that the direction the wind is coming from is as important as how fast it’s moving.
So how can you know?
Before you head out, take a look at the wind forecast and note the direction of the wind. This can seem daunting at first, but there’s only two bits of information you need to know.
A wind arrow points in the direction that the wind is blowing.
A label, like NW or SE, tells you where the wind is coming from, and is what we name the wind.
So:
An arrow pointing north = wind blowing toward the north = a south wind.
An arrow pointing south east = wind blowing toward the south east = a northwest wind
Once you understand where the wind is coming from, take a look at a map of where you’ll be paddling (google or apple maps works just fine, no need for fancy nautical charts yet), and ask a few easy questions:
Are there large sections of water that the wind will be blowing across based on its direction? The water is likely to be bumpier here, and the more open or stronger the wind is blowing, the bumpier it will be.
Is there a large landmass blocking the flow of wind (maybe a headland, island, or neck)? The areas behind these are likely to be more sheltered.
Higher elevation will improve shelter, while stronger winds will lessen it.
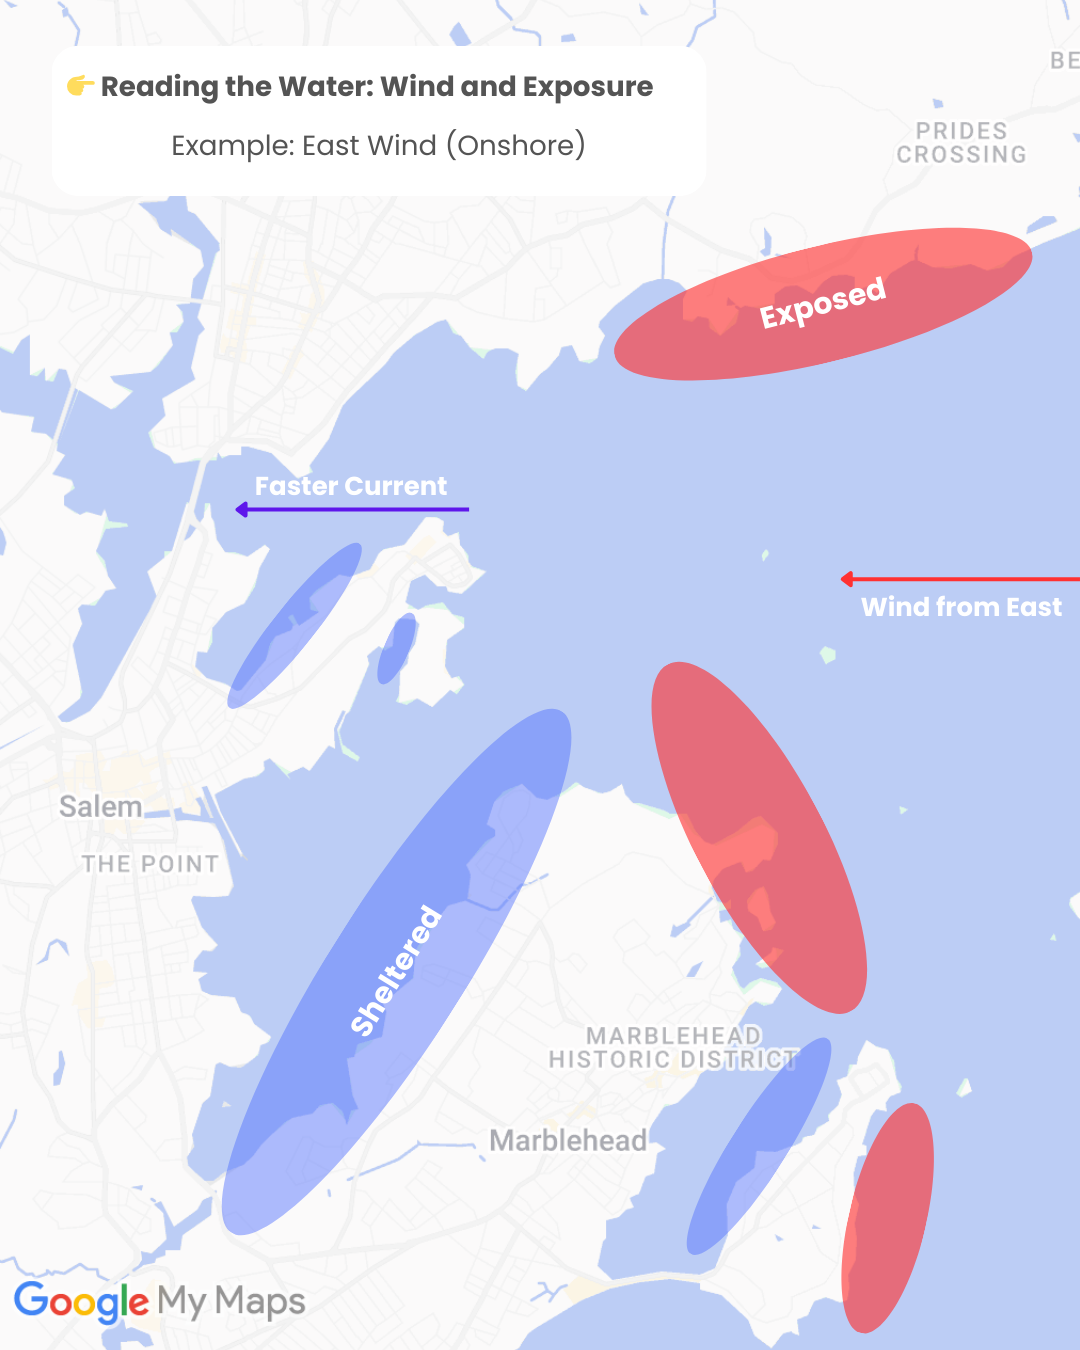
In the accompanying graphic, you can see an example of which areas are sheltered vs. exposed on an east wind. On a west wind, many of those spots would reverse. (A good practice would be to ask why the section of coast running Northeast at the top would still be a bit exposed to a west wind).
Swell
When we talk about swell, we’re referring to longer, rounder, more organized waves. These are formed further away, as opposed to the shorter, choppier waves created by local wind.
In open water, swell will usually just lift your boat or board up and down. It can feel a bit unnerving at first, but it’s often manageable. The real impact of swell shows up near shore. As swell approaches land, its energy compresses, causing waves to steepen and eventually break, creating the crashing waves you see on many beaches and rocky coastlines.
So how can you know?
Take a look at a map of your paddling area.
Are there sections of coastline that face a large expanse of open water? These areas are more exposed to swell.
In our area, for example:
The coastline from Marblehead south to Nahant is fairly exposed
As is the stretch from Manchester-by-the-Sea up through Gloucester
On the other hand, harbors, bays, and deep coves will often be more sheltered from swell.
What to look for
Coastlines facing open ocean = more exposure
Coastlines tucked behind land = more shelter
The larger the open water the swell travels across, the more energy it can carry
Importantly, you don’t need to become an expert in wind and waves. Before you head out, take a minute to picture the area you’ll be paddling. Think about how the wind will move across the water, and where both wind and swell might be strongest. Most importantly, identify where you can find shelter if you need a break.
2) Movement
Is the water moving, or mostly still?
Water can move due to tide, river current, or even wind blowing across the surface. Thinking ahead about which bodies of water might feature one or more of these, and how it will affect your paddling, can save you a lot of trouble while out on the water.
Tidal Currents
Anytime you’re paddling on the ocean, there is potential for tidal currents. In our region, while open areas of water may experience very little tidal current, bodies of water that are enclosed or compressed between land masses can experience 3 knots of current or more (that’s about 3.5 mph).
Since many newer paddlers move at around 2–3 mph, that means the current can either carry you along or stop you in your tracks.
So how can you know?
Start by looking at a map of where you’ll be paddling.
Are there areas where water is being funneled between land?
Narrow channels
Gaps between islands
Harbor entrances
These are the places where tidal current will be strongest.
Local tip: In our area, the open water past Salem doesn’t experience very strong tidal currents, and the wind is often the more dominant force. However, in places like the entrance to Beverly Harbor, further up the Danvers River, or the Ipswich and Essex estuaries, tidal currents will be significantly stronger.
Understanding the timing
Next, check the tide times—when high tide and low tide occur.
Near high tide and low tide, the water is relatively still (this is called slack tide)
About halfway between them (roughly 3 hours before or after), the current is strongest
You can look online for local tide times, or use an app on your phone. We like Tides Near Me for a free option, and Tide Graph Pro for a paid option with a bit more features.
What to look for
Narrow areas = faster current
Wide/open areas = slower current
Mid-tide = strongest movement
High/low tide = weakest movement
How to use it
Plan crossings of constricted areas near slack tide, when the water is calmer
Avoid crossing strong current at mid-tide if possible
If timed right, a current moving in your direction can make your paddle much easier
Unlike wind and swell, movement from the tide isn’t always visible, but it can impact your planned paddle quite a bit. The good thing is that the times can be known with certainty ahead of time, so it can be easier to plan around.
Rivers (Non-Tidal)
What about freshwater rivers that aren’t affected by tides?
Most people already know that rivers have a direction of flow, but with a quick look at a map, you can learn a lot more than just “which way is downstream.”
So how can you know?
Start by looking at the shape of the river.
Rivers generally flow from smaller to larger:
Narrow streams feed into wider rivers
Tributaries branch into main channels
Even without elevation data, this can give you a good sense of which way the water is moving.
Next, look at how the river behaves:
Is it relatively straight? Or does it wind back and forth?
Straighter sections tend to move faster
More winding (meandering) sections are often slower overall, but can have faster and slower pockets within them
What to look for
Narrow sections = faster current
Wider sections = slower current
Outside of bends = faster water
Inside of bends = slower, often shallow water
3) Consequences and Plan B’s
Once you’ve given yourself an overview of the area and the conditions, it’s important to ask: If something changes, how hard is it to deal with?
If the wind forecast is off by a few degrees (maybe the wind is NNW instead of NW) will that change where you find shelter? (It often does).
If a paddle takes longer than expected, will it put you in a part of the tide cycle you were hoping to avoid?
If you capsize along a river, will there be easy places to get out of the water?
Being aware of how conditions could be different than expected, and having even a loose plan to deal with these changes, drastically increases your chances of a successful paddle.
It’s easy to feel overwhelmed by how much there is to learn, and tempting to think, “I’ll just figure it out when I’m out there.”
But taking a minute to ask a few simple questions can go a long way toward turning your paddle into the experience you hoped for, instead of the one you feared.
Is the body of water exposed to wind or swell?
Will the water be moving due to tide or river current?
If conditions change—or the forecast is a bit off—how will that affect my paddle?
👉 Next week, we’ll build on this by looking at how your boat or board choice affects your paddle—and why the same conditions can feel completely different depending on what you’re on.