
Planning Your Paddle: 03 - Choosing Your Route
Can I tell you a quick story? It’s a little embarrassing.
In my first year working as a sea kayak guide at Essex River Basin Adventures (ERBA), I took my parents, who were visiting from New York, for a paddle around the river basin. The plan was to paddle around Choate Island, through the winding salt marsh, and use the cut that goes behind the island at low tide to get back to our launch point.
Yet once behind the island, I couldn’t find the cut. Several dead ends later— and after one quickly (but not quickly enough ) abandoned attempt to drag the kayaks through knee-deep mud—we gave up, turned the boats around, and paddled the long way back around the basin.
When we (finally) got back to the launch, the owner of ERBA—and basin expert—Ozzie was waiting to pick us up. When I relayed my story to him, including my bewilderment at not being able to find the cut, he replied, simply and non-judgmentally (but with perhaps a bit of a smirk): There is no cut that goes behind Choate at low tide.
I had planned the perfect paddle, but under false assumptions.
Below, I’ve outlined some tips to help you choose the best route for your paddle adventure; one that won’t leave you feeling embarrassed in front of your parents AND your boss (they were each very gracious about the whole thing).
Planning for the Environment
In our area (and while paddling throughout much of New England) you’re likely to face three main factors on the water: wind, tides, and river currents. In the first post in this series, we covered how to use forecasts and maps to understand how each of these will affect you on the water. Now, it’s time to put that to work. Let’s tackle these in reverse order.
RIVER CURRENTS
One of the easier things to plan for is river currents, because you can pretty quickly identify which way they’re moving. Once you know this, one of your best options is to paddle against the current first, while you’re fresh and energetic, and then let the current carry you home. Depending on the speed of the current, it could take quite a bit less time to come down the river than to go up it, which means you likely can paddle further up the river than you think. Just don’t push it too hard.
A few tips for paddling against the current:
The inside of riverbends usually has slower moving water, so if conditions allow, try paddling there. Just be mindful that it will be shallower here, so watch out for obstacles.
Look for eddies—places where the flowing water has backfilled behind an obstacle, like a log or rock, usually along the sides of rivers. These sometimes have a reverse current that will take you up the river, opposite the normal flow. Just be careful when crossing the eddyline back into the main part of the river. This confused line of water coming straight off the obstacle can turn your boat in surprising directions, so it’s best to cross it as head on as possible, and with some speed.
Paddling downstream is comparatively easy, but you have to plan ahead for obstacles. Just because you stop paddling, doesn’t mean your boat stops moving, so scout ahead, and plan maneuvers early. Watch out for “strainers”— hanging branches or other obstacles that allow water to pass through, but would trap a kayak or paddleboard against them. These are dangerous, and can be deadly. Avoid them at all costs.
One other fun way to run a river with current is to do a oneway trip. It’s a bit more of a logistical challenge, as you’ll need to find a way to get back to your car at the launch once you’re done (using two vehicles is a good way to do this). A really fun local route for this is on the Topsfield River. You can put in at the Rt. 97 canoe launch in Topsfield, and take out at the Bradley Palmer Canoe Launch. Because of how the river meanders, you’ll get about five miles of paddling through the Mass Audubon’s Ipswich River Wildlife Sanctuary, all with the current at your back. And the put in and take out are only about a five minute drive from each other.
TIDAL CURRENTS
You can work with tidal currents in a similar way to river currents: paddle against the tide first, when you’re fresh, and then let it carry you home. But you have to keep in mind that the speed of the current changes throughout the tide cycle— fastest at midtide, and almost non existent at the change from high to low, or vice versa. You might start paddling against the tide shortly after the tide change and find it relatively easy, then find yourself surprised two hours later when the tide is really racing and you’re working for every stroke.
The tide will also run fastest in the middle of the channel, so staying outside of this area is a good idea if paddling against the tide. This is also usually where most of the boats go, which is another REALLY GOOD reason to stay out of the middle of the channel.
A really neat thing you can do with the tides is to plan it so that the tidal switch is about halfway through your paddle, around the time you plan to turn around. You might start paddling up-river two hours before high tide, with the current. As you approach high tide, the current slows and eventually switches, at which point you also turn around and paddle home, utilizing the current the whole time.
One more thing to remember about tides is that there are a lot of places that have water at high tide, and are fully dry at low (like, behind Choate Island, apparently).
How can you know?
One way is to look at a nautical chart. The green/brown areas show places that are submerged at high tide, and dry at low. An easy reference you can use on the water is, at high tide, to stick your paddle straight down and see if you can touch the bottom. If you can, there’s a good chance it will be dry at low tide. (Additionally, at mid tide, if you can stand somewhere and the water is waist-high or lower, you’re likely looking at dry land in a few hours, or less. These are both approximate, and depend on the tidal exchange in your area (ours is about 9 feet here), height of the person, and length of the paddle.)
WIND
Like tides and river currents, wind can either help you or hurt you. One good strategy, similar to river currents, is to paddle against the wind first, and then let it blow you back. This is a safe option, intuitive to most paddlers, and all but ensures that you’ll make it back. But there is a downside: Most people find paddling into the wind to be discouraging, and so they won’t actually paddle that far before turning around, shortening their paddle to something barely worth loading up for.
However, there is another way to plan it. Depending on the layout of your coastline, you can look for the spots that will be sheltered from the wind, paddle there, and spend the majority of your time in calm water. This may mean paddling back against the wind for a short section, but as long as you are aware of this (and understand your limits), this is a really good way to plan an enjoyable paddle even when the wind is up a bit. It might be helpful to do a worked example on this one.
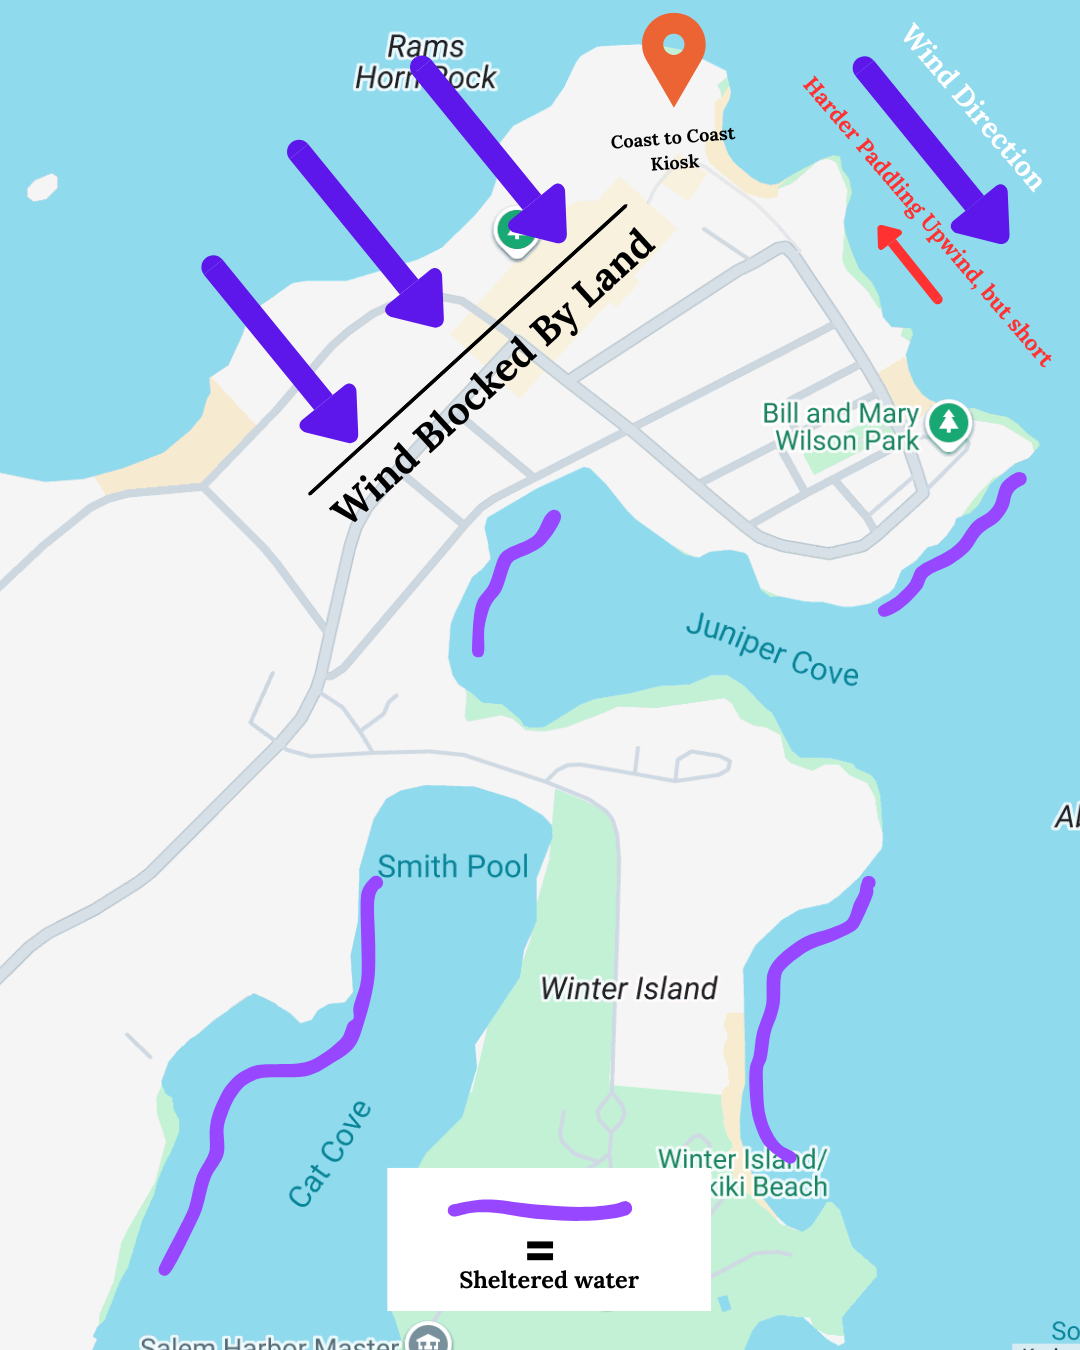
Our Salem Willows location sits at the top of Salem Neck, essentially a peninsula that runs northeast between Beverly and Salem Harbors. A northwest wind will blow parallel to the top of the neck, but will be blocked by the neck itself on the southeast side, providing relatively sheltered water. You can leave our kiosk, paddle with the wind until you get to the corner, then hug the coastline and stay in some pretty calm water. You can spend a while paddling here in some really nice water, and will then just have a short section of upwind paddling on the way back. The only think you have to make sure of is that the wind isn’t stronger than what you’re able to paddle against, and that it’s not forecast to increase past that point.
OTHER CONSIDERATIONS
Once you’ve got your route planned, spend a little time thinking about how you might to adapt it if conditions change. If the wind shifts, will you lose your shelter? If the tide is too strong to cross, are you able to back track? Where are your emergency take out points if a storm comes up, equipment breaks, or there is an injury?
Safety Equipment:
It’s worth spending just a minute to talk about what you should bring with you. There’s an endless list of things you COULD take with you, and it depends a lot on what type of water you’re paddling in, how long you’ll be out, who you’re paddling with, what your experience is, and how quickly help could, or could not, get to you. For a short excursion, maybe a couple of hours, in good conditions, in water you’re at least vaguely familiar with, here’s a list of things we like to have with us.
VHF radio or phone in dry bag
VHF radios are great, but for most people, a phone is going to be more accessible—and more practical. It gives you instant communication if you need help, along with maps, a compass, and of course, a camera. That last one came in handy once when a paddler was blown offshore to an island and sent us a photo of his location so we could go get him.
Of course, a waterproof bag is essential—and make sure your phone is fully charged before you head out.
Firstaid Kit
Whether something small like a barnacle scrape or something more dramatic, having a way to manage injuries on the water is a great idea. We really like separating types of bandages, gauze, etc into separate ziplock bags, then packing that all in a dry bag. A separate zip lock of folded paper towels is really handy for drying wet wounds before bandaging. Don’t forget gloves, and make sure the whole bag is lashed securely to your board or stowed somewhere inside your boat!
Tow Rope or Something Similar
If you’re going to be paddling with a group, having some way to tow a tired, injured, or scared paddler can be really helpful, and save having to do an unexpected takeout, or call for help. Industry and safety standards require that tow line to be quick release, so you can get disconnect from the two person in an emergency, but at the end of the day, having a tow rope that’s not quick release is better than not having one at all (I may get some pushback here, and that’s okay. Non-quick release tows carry risks, but the risk is almost always worth it if it’s your only option.)
There are plenty of other items we usually suggest bringing: Extra sunscreen, hat, sunglasses, water, snacks. You can go as deep as you want, and there’s an argument (a valid one!) that you’d rather have it and not need it, than need it and not have it. But, we think for most short excursions, you’re probably okay to leave the flares, emergency beacon, and spear gun at home.
What do you think? Are there other items that you would bring with you no matter what? Or, have you had a paddle experience that would have benefited from a little more (or really, any at all) thoughtful planning? Share them below!
Thanks for reading, and we’ll see you on the water!
Aaron